
COMPLETE GUIDE TO LUMINOSITY MASKS & FREE 16-bit 7-LEVEL LUMINOSITY MASKS ACTION

WHAT ARE LUMINOSITY MASKS?
HOW TO USE LUMINOSITY MASKS TO CREATE FNE ART PHOTOGRAPHY?
In this complete guide to luminosity masks, you will learn everything you need to know about luminosity masks. To my knowledge, it is the most comprehensive guide to luminosity masks you will find.
I will explain in detail what luminosity masks are and how to use them to improve your photography. By working with luminosity masks, you will be able to express your vision in your images in the most accurate and compelling way, whether you work with color photography or with black and white photography.
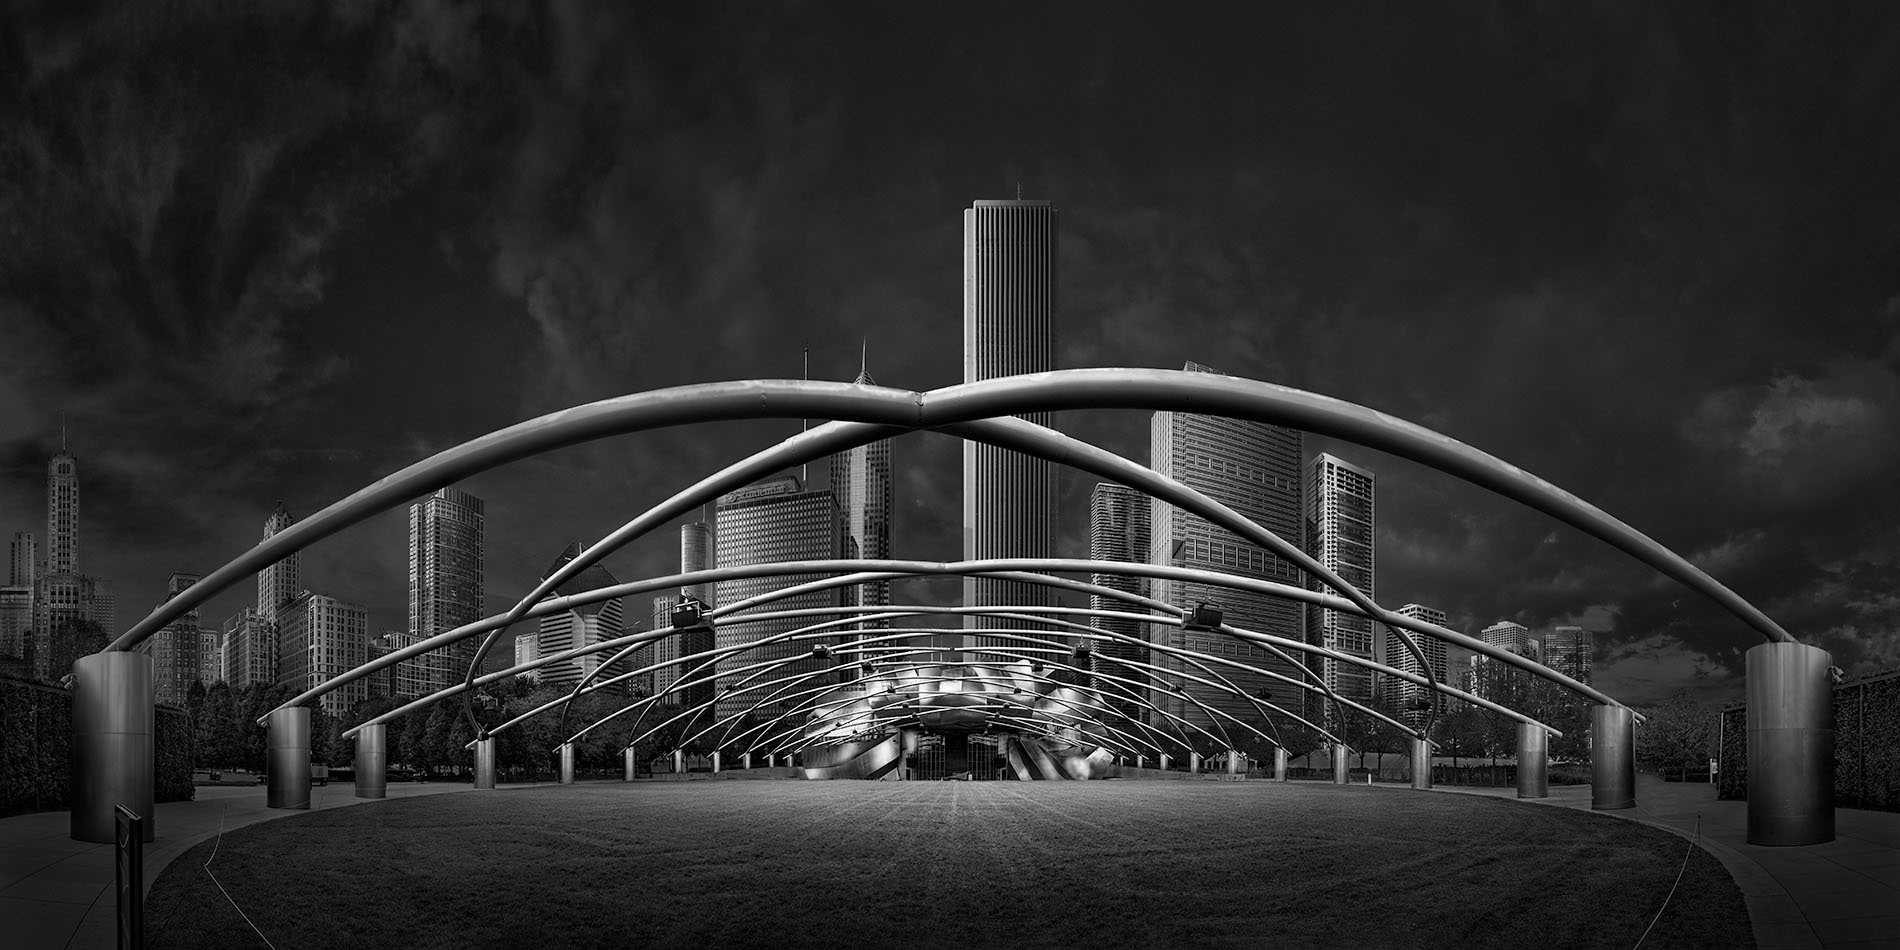
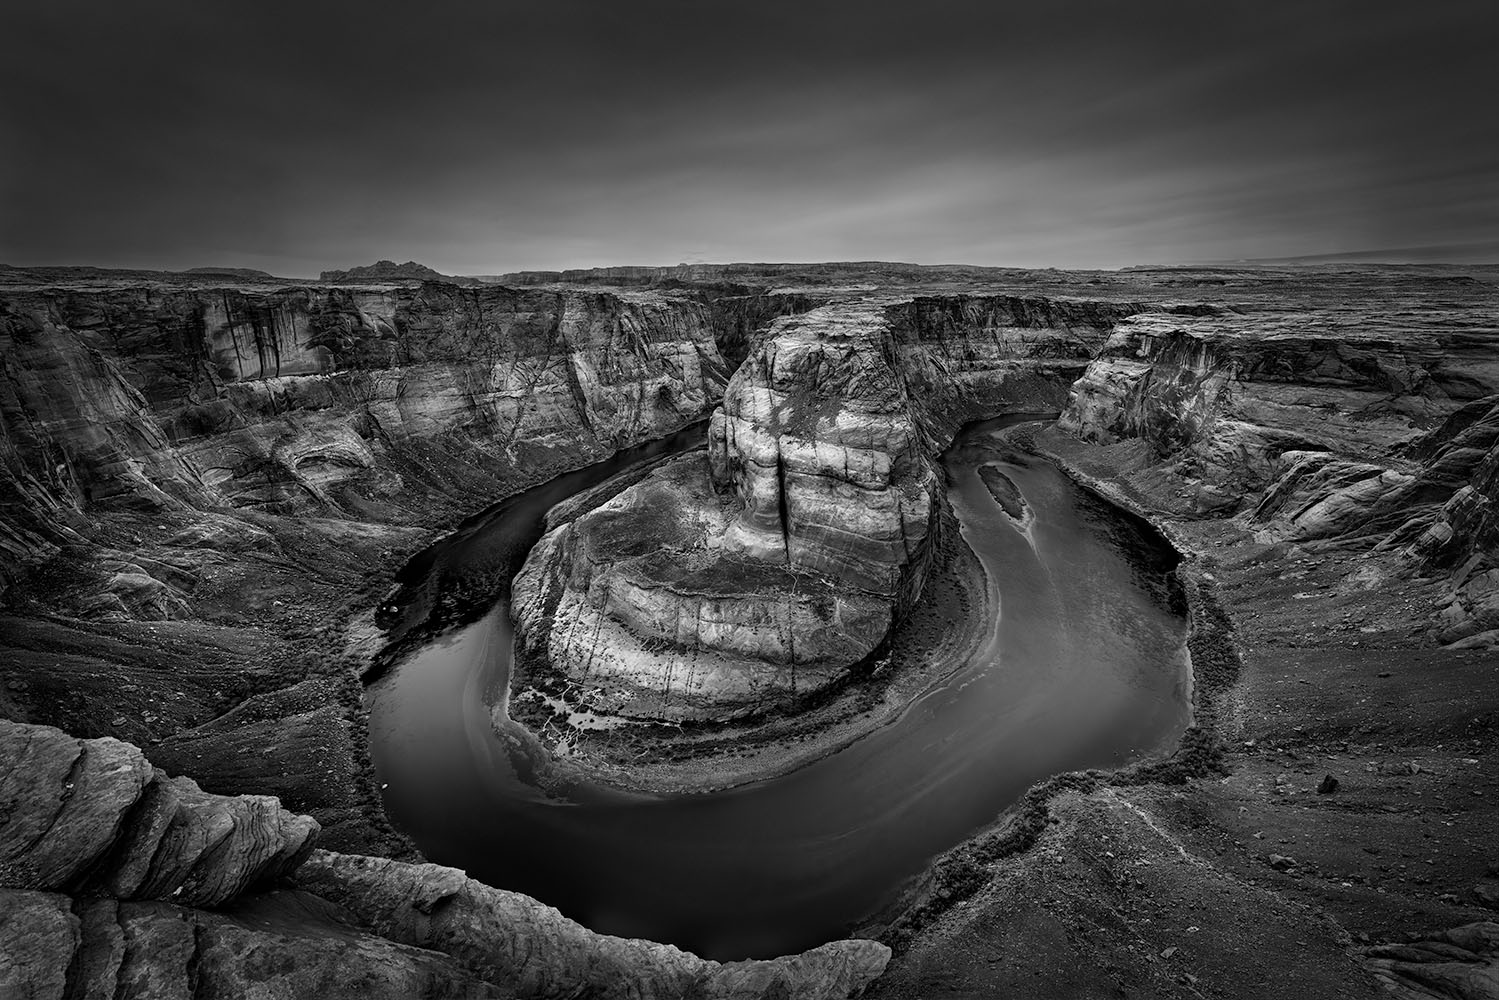
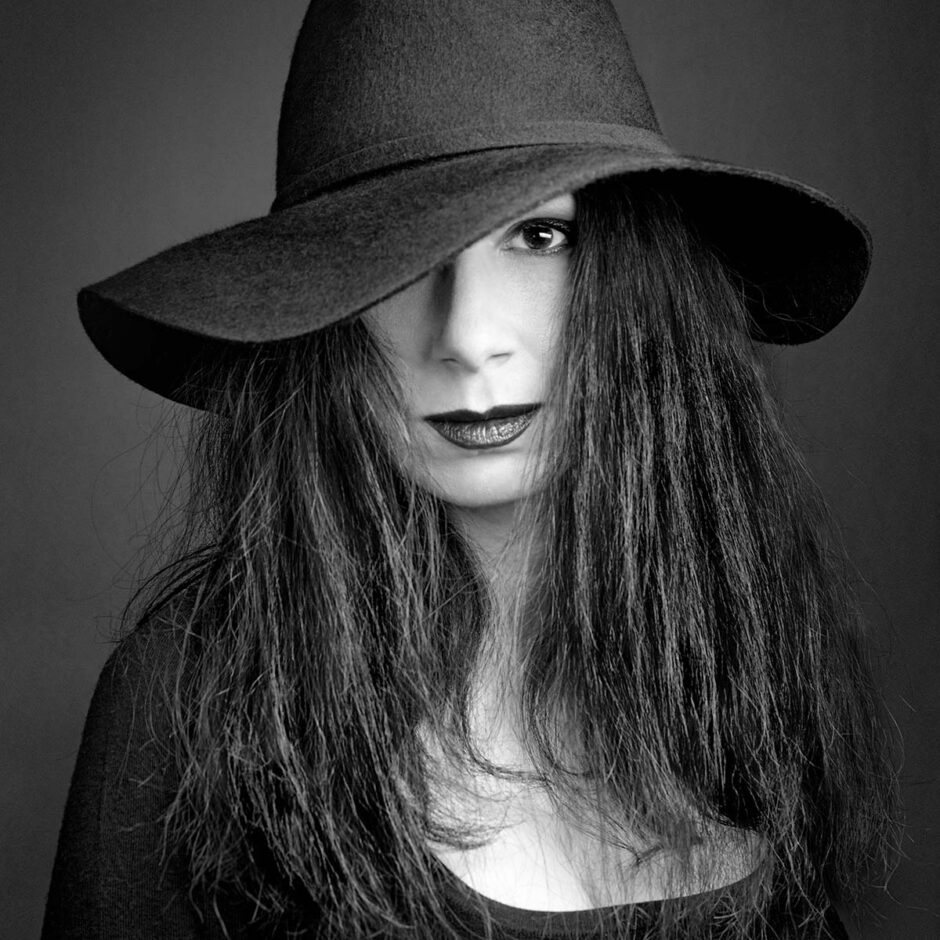
All the images in this guide have been created using luminosity masks. This gives you an idea of the power of this tool and the diversity of uses it offers us.
This guide is part of my collection of complete guides on different photography genres and techniques. You can find the other guides in the Fine Art Photography Tutorials section together with hundreds of other tutorials and articles. You can subscribe here to receive the upcoming guides I am working on and will publish in the future, as well as the second part of this tutorial.
I am also offering together with this complete guide to luminosity masks a FREE advanced luminosity masks action, the 16-bit 7-Level (en)Visionography LumMasks Action, that you can download and use to create amazing images. This way, you can immediately put into practice the knowledge you will get from this guide. Keep reading to find out how to get the luminosity masks action.

INTRODUCTION
I am constantly asked by my students what luminosity masks are and how to work with them, and I have worked extensively in my mentorships and workshops with my students on learning the best and most advanced way to use luminosity masks to express our vision the best in photography. I am writing this complete guide to luminosity masks to demystify for everyone the concept of luminosity masks, which seems to be a mystery for many, and to make the work with these “mysterious” masks more accessible and, why not, even fun.
If you want to learn more about this subject and about black and white fine art photography in general, from the moment of conception to advanced post-processing, I will be talking about this subject and demonstrating everything extensively on the practical side in my next workshop that you are welcome to join.
WHAT ARE LUMINOSITY MASKS?

In short, luminosity masks are a technique in digital editing where you create selections based on the brightness values of an image. They are used to target specific tonal ranges in an image for precise adjustments to brightness, contrast, and color.
Luminosity masks are generated by creating masks based on different brightness levels of an image and then using these masks to isolate these areas from one another and make targeted adjustments to the image. The result is an image with better tonal separation and improved detail in both highlights and shadows.
A BIT OF HISTORY
Luminosity masks are a concept existing in Photoshop since it introduced masks in 1994 in Photoshop version 3.0. The concept was popularized by photographer Tony Kuyper, starting in 2006, when Tony developed a technique for creating a series of luminosity masks related to the levels of luminosity of an image.
In the subsequent years, many have elaborated on this subject and started using luminosity masks in their photography.
Nowadays, luminosity masks, in their different forms, are one of the most effective techniques you can use for processing architecture photography, landscape photography, and pretty much any genre of photography, both when working with color photography, as well as with black and white photography.
MAIN TYPES OF LUMINOSITY MASKS
In their most well-known version, Luminosity masks are created using Photoshop Channels. Each channel will define a certain luminosity mask, which can then be used as a layer mask to apply adjustments to specific brightness ranges in the image. This offers precise control over the tonal values in an image, allowing you to make targeted adjustments to highlights, mid-tones, and shadows. Luminosity masks can be used for tonal or color control to achieve a certain tonal or color balance in an image.
The main categories of luminosity masks and the most well-known ones are the Highlights (Brights), the Midtones, and the Shadows (Darks). The main luminosity masks can be refined further to target different levels of brightness in the highlights, different levels of darkness in the shadows, or different levels of intensity in the midtones.
Here is what each type of luminosity mask does.
1. Highlights (Brights) Mask: targets the bright areas of an image.
2. Shadows (Darks) Mask: targets the dark areas of an image.
3. Midtones Mask: targets the mid-tone areas of an image.
The specific type of luminosity mask used will depend on the desired effect and the specific tonal range being targeted for adjustment.

WHAT SOFTWARE TO USE TO CREATE LUMINOSITY MASKS?
Commonly, luminosity masks are mainly created in Photoshop.
Some other programs also support the creation of luminosity masks to apply adjustments, but their use is more restrictive than the use of luminosity masks in Photoshop. The process of creating luminosity masks may vary depending on the software, but the concept and usage of the luminosity masks remain the same across all platforms.
Here are some examples of programs that support luminosity masks or different luminosity adjustments.
- Photoshop – The most used software for creating luminosity masks. It provides a range of tools for creating and using luminosity masks, including the Channel Mixer and the Calculations tool.
- Lightroom – Supports the creation of luminosity masks through the use of graduated filters and the adjustment brush, which allow you to make targeted adjustments to specific brightness ranges in an image.
- ON1 Photo RAW – Creates luminosity masks in a similar way to Lightroom.
- Capture One – Provides a range of tools for creating and using luminosity masks and custom masks based on luminosity.
- DxO PhotoLab – Supports the creation of luminosity masks and provides various tools for adjusting tonality. The specific tool used to control luminosity in DxO PhotoLab as well as in the DxO NIK Silver Efex Pro is the Control Points that apply adjustments based on the luminosity of a certain area of an image.
- Skylum Luminar – Has tools for creating and using luminosity masks, including blend modes.
- Affinity Photo – Also supports the creation of luminosity masks for applying adjustments.
Photoshop is the classic and the most powerful software for creating and applying luminosity masks. It gives you the highest level of control and the highest number of tools to process an image based on luminosity masks.
When we talk about luminosity masks, we are most of the time talking about luminosity masks created and used in Photoshop. Photoshop is the only program where you can make precise luminosity masks that you can refine to a high degree.
The other programs mainly use luminosity-based adjustments. The control over the actual selected area of luminosity is not as accurate as in Photoshop and is more software dependent rather than user-dependent as in Photoshop.
For this reason, my recommendation is to use luminosity masks in Photoshop in order to have the utmost control over the results of your edits. The luminosity masks created in Photoshop are a remarkably powerful tool to transform your images.
By using luminosity masks in Photoshop, you can target extremely precisely different areas in the image and apply various effects to them.
In addition, you can use luminosity masks to blend images of different brightness levels to recover the highlights or shadows of an over or underexposed image.
You can use this technique when shooting in high contrast conditions when the camera cannot cover the entire dynamic range of a scene in only one capture. When that happens, you can shoot a series of images exposed at different levels and blend them together using luminosity masks.
For instance, you shoot a bracketed exposure made up of one or more over-exposed images to increase the details in the shadows, one or more midtone-targeted exposures to cover the tones in the middle, and one or more under-exposed images to increase the details in the highlights. Then, by using luminosity masks, you retain from each image the areas that are well-exposed and create a luminosity-blended image as a result.

MAIN PHOTOSHOP TOOLS TO USE WITH LUMINOSITY MASKS:
LAYERS AND MASKS
Luminosity masks are a rather advanced technique to use in Photoshop. In order to understand luminosity masks and be able to handle them comfortably, you need to first understand how layers and masks work.
To get the most out of working with Luminosity Masks, at least a basic understanding of layers and masks is required. While everybody knows what layers and masks are in a general way, an advanced understanding of layers and masks may be challenging, especially for less advanced Photoshop users. So one of the most important things I would recommend before working with Luminosity Masks is to try to get as good an understanding as possible of how layers and masks work.
While the scope of this complete guide to luminosity masks is not to analyze extensively layers and masks in general, following I will give you some information about them and touch on the most important aspects.
USING LAYERS IN PHOTOSHOP
Layers are a way to separate and organize different elements of an image into separate, editable objects. Each layer can hold a different element of the image, such as images, adjustments, text, or graphics, and can be edited, moved, or deleted independently of the other layers. This makes it possible to make changes to one layer without affecting the others and to easily modify the structure of an image. Layers are stacked on top of each other to form a complete image, with the bottom layer serving as the background. Layers can be transparent or opaque, or they can be partially opaque and partially transparent.
The main reasons to use layers are to have more control over the changes we make to an image and to apply the editing in a non-destructive way. Working non-distructivelty also means we have more control.
In a nutshell, by using layers, we aim to distribute the effects on the image in different categories, applying each effect on a different layer, so we have more control over how that effect is applied and to which area of the image it is targeted. Separating different effects from one another allows us to control the intensity of each effect independently from the other so we can create the ideal intensity needed in each area of the image.
For instance, if we want to brighten a certain area of the image, but darken another area, we can use two layers to apply the effect. On one layer, we will apply the brightening effect, and on the other layer, we will apply the darkening effect. Each effect will be targeted to the specific area of the image that we need to brighten or darken. If we apply the effects on separate layers, we have more control over them because we can use different tools on each layer without the effects canceling each other. For instance, if you apply the brightening effect and the darkening effect on the same layer, they may cancel each other. However, if you apply the brightening effect on one layer and the darkening effect on another layer, you have the freedom to create in each layer a different effect, even opposite effects that don’t affect or cancel each other.
This is the main reason we use layers. We use them to separate different effects applied to the image so we can control them better.
USING MASKS IN PHOTOSHOP
Layers are a powerful tool in post-processing, however, a regular layer will be opaque and consist of pixels on its entire surface, which means that only the top layer will be visible when we look at an image unless we modify its characteristics.
To control layer visibility, we can use what we call masks. A mask is a tool we use to hide or reveal parts of a layer or to control the intensity and distribution of an effect we apply to the image, like for instance, when we use adjustment layers. Masks use black, white, and shades of gray to determine the transparency of different parts of an image or the intensity of an effect. A white mask will reveal the entire layer, while a black mask will hide it entirely. Shades of gray determine varying levels of transparency, so by using a shade of gray, you can create partial transparency of a layer. We use masks to make selections, apply adjustments, or edit specific parts of an image without affecting the rest of the image.
By combining layers with masks in Photoshop, we can make unlimited adjustments to the image and even transform it completely. Layers and masks are the Holly Grail of Photoshop, and if you learn how to work with them, nothing can stop you from manifesting your vision in your photographs.
HOW TO WORK WITH LUMINOSITY MASKS?
THE HOLY GRAIL OF PHOTOSHOP – LUMINOSITY MASKS AND “LUMINOSITY SELECTIONS”
And now, we are coming to the main subject of our tutorial: Luminosity Masks.
If I hadn’t just said that layers and masks are the Holy Grail of Photoshop, I could have definitely said that about luminosity masks. Because once you understand how layers and masks work, you have access to the amazing things you can do by using luminosity masks. And from there, the sky is the limit!
The first thing I want to say about luminosity masks is something that will be helpful to many since I know from my students that many people find it difficult to understand. And that is that the luminosity masks can be used as regular masks but they can also be used to create selections and this is where the real magic happens.
Many people who start working with Luminosity Masks or with masks, in general, don’t know that any mask can be converted to a selection and used to apply an effect that you may not be able to apply by using the mask alone. Selections can be much more flexible than masks when working with local adjustments and when you need to transform an image extensively.
Personally, in my processing method, which I call Photography Drawing, I use selections much more than I use masks, and I do the same when I use luminosity masks.
In conclusion, while talking about luminosity masks, we can also talk about what I call “Luminosity Selections”. I created this term to emphasize how precisely we can control luminosity by using selections vs masks.
This approach of using “Luminosity Selections” is different than the mainstream approach, and it is at the core of my post-processing method, which I call “Photography Drawing”. Photography Drawing practically means how to process an image as if we were making a drawing or a painting. Even if we use different tools, what we are doing with our processing software is what draftsmen and painters do with pencils or brushes – render light and shadow to tell a story. You can read here an introduction to Photography Drawing.
In conclusion, while talking about luminosity masks, we can also talk about what I call “Luminosity Selections”.
I created this term to emphasize how precisely we can control luminosity by using selections vs masks.
This approach is at the core of my post-processing method, Photography Drawing.
This is what the luminosity masks do, in essence. They separate the image into areas of luminosity that can be used to apply different effects selectively. They can be used to make selections of those areas in order to apply the needed effects.

HOW TO CREATE LUMINOSITY MASKS?
There are two main ways of creating luminosity masks in Photoshop: Channel Intersections and Calculations.
Channel intersections are one of the ways to create luminosity masks in Photoshop by combining different color channels of an image to create new channels based on luminosity levels.
In the case of the Calculations method , the other main way to create luminosity masks in Photoshop, you use both color channels and the Calculations tool to Separate the Luminosity Levels in the Image.
The first method, by using Channel Intersections, is considered the easier method, while the Calculations method is considered a more advanced and a more precise method.
The difference between the two techniques, except for the level of difficulty, is that if you create luminosity masks by intersecting channels, the result will be 8-bit luminosity masks.
If you create the masks using the Calculations, the resulting luminosity masks will have a higher accuracy, the result being 16-bit luminosity masks.
Keep in mind, however, if you use 16-bit luminosity masks to create selections, the result will have again 8-bit accuracy, since the selections will always be 8-bit.
The only case when you will apply the effect while maintaining the 16-bit accuracy of a 16-bit mask is if you use adjustment layers.
While 16-bit masks may give you more accuracy in theory, in practice, there is not much of a difference from a perceptual point of view between working with one or the other accuracy level. However, for the utmost accuracy, it is better that you use-16 bit luminosity masks.
To have an idea, here is in a nutshell how you can create luminosity masks by using the Channel Intersection method, which is the simpler method of the two. This method will create basic 8-bit masks, but they are good enough for many cases.
- Start by creating a layer merging all the layers in the image. You can do that by using the command Stamp Visible from , or by using the shortcut Ctrl/Command + Shift + Alt while clicking on the top layer.
- Go to the Channels palette and select the RGB channel.
- To create the highlights mask, select the brightest areas of the image by holding down the Ctrl/Command key and clicking on the thumbnail of the RGB channel to create a selection. The result will be a selection of the bright areas in the image.
- To create the shadows mask, invert the highlights selection by going to Select > Inverse or using the keyboard shortcut Ctrl/Command + Shift + I.
- To create the midtones mask, subtract the shadows selection from the highlights selection. To do this, first activate the highlights selection, then go to Select > Subtract Shadows from Highlights.
- Then you can refine the highlights, shadows, and midtones masks further. To refine the highlights and shadows, you will first intersect each channel hosting the highlight or shadow area of the image with itself, which will narrow down the area selected to brighter highlights or deeper shadows. Then, you will subtract each level of shadows from the respective level of highlights, creating like this different level midtone luminosity masks.
Don’t worry if this feels confusing or too complicated. Creating luminosity masks is not easy and this was only the simpler method.
Creating luminosity masks, either by using Channel Intersections or the Calculations tool, can be tedious and time-consuming. This is why you don’t need to do it every time you work on an image. Nobody does! Instead, the way to go is to make an action in Photoshop that will create the luminosity masks for you. This way, you use your time much more effectively by working on your image instead of spending your time creating luminosity masks.

FREE LUMINOSITY MASKS ACTION – 16-BIT (en)Visionography LumMasks
7-Level 16-bit Luminosity Masks Action – Fully Editable
The Highest Level of Accuracy Out There – More than Double the Zone System
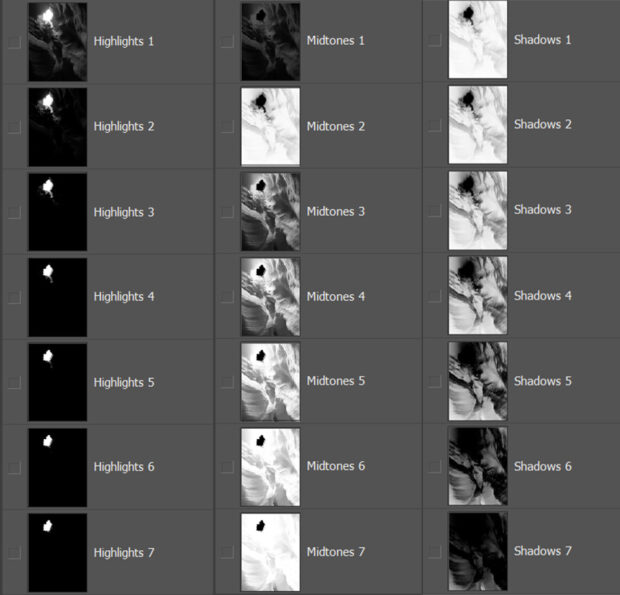
To save you time and spare you from this tedious process, I have created for you an advanced 16-bit action for making luminosity masks. The action has 7-level deep masks for highlights, shadows and midtones, which gives you the maximum control over your image.
This means that you can go as far as seven levels deep in the structure of the image and create seven different levels of luminosity for each category of masks. You can isolate seven levels of light intensity for each brightness category and apply adjustments targeted to that level of luminosity.
(en)Visionography LumMasks Action was created with the most advanced techniques, so the resulting masks are 16-Bit, meaning they have more detail and accuracy than the regular luminosity masks.
In addition to the knowledge you will get from this complete guide to luminosity masks, having a powerful tool as the (en)Visionography LumMasks action to work with will give you an important edge in your photography work so that you can make your photography vision reality through processing.
When you use this 7-Level Luminosity Masks action, you have access to seven levels of highlights, seven levels of midtones, and seven levels of shadows that you can isolate.
All in all, you have 21 DIFFERENT LUMINOSITY MASKS, meaning you can isolate 21 LIGHT INTENSITY LEVELS in your image. So you can isolate more than twice as many levels of light than the levels you can find in the Zone System.
That is unheard of!
You can see below in detail the zone separation in 21 luminosity masks sections – 7 Highlights Masks + 7 Midtone Masks + 7 Shadows Masks. This is how much control you will have. You will rarely need more control.

You will hardly ever need more accuracy, no matter what type of image you are working on. And if you still need more precision, the masks are fully editable, and you can easily fine-tune or combine them.
Most of the actions or Photoshop panels you will find out there only give you access to five, at the most six levels of luminosity for each category. This can sometimes be limiting, and this is why I created this action to give everyone the utmost control over their image, and even more so, in a completely FREE Photoshop action.
To receive the action, subscribe below and you will receive the action download details. Even if you are already a subscriber, please introduce again your email below so you can receive the material at that specific email – otherwise, we will not know where to send it. Please type your email address carefully. The download link, info, and documentation are ONLY sent to valid email addresses.
The action is FREE and you can use it for as long as you like, while also receiving free updates whenever available.

Since the creation of free resources requires a large amount of time and effort, creative and practical effort, it would be much appreciated if you considered making a donation to our website so we can keep this pro bono work going. I’m more than happy to bring resources and inspiration to everyone who loves photography, and I want to keep doing it more and more in the future. So your help with that will be highly appreciated. By making a donation, you will be part of this generous effort, and you can be proud of being a supporter of art and artists, like the famous Maecenas of the past. Art and artists need your support, as always in the history of art and photography. You can make your donation by clicking on the button below. Thank you!
PURPOSE OF USING LUMINOSITY MASKS
Now that you have downloaded your copy of the 7-Level 16-bit (en)Visionography Luminosity Masks Action, let’s see how you can use it to create some amazing images.
The versatility of luminosity masks makes them a valuable tool for a wide range of applications.
Luminosity masks can be used literally in any genre of photography, from landscape or architecture photography, to portrait photography, real estate photography, product photography, still life, or street photography. Any genre of photography where you need to control light and shadow can be a candidate for using luminosity masks. And, as we all know, throughout photography, the most important thing we work with when editing an image is light and shadow. So luminosity masks can be considered the most universal post-processing tool.
Using Luminosity Masks in Color Photography and Black and White Photography
Luminosity masks can be used both in color photography as well as in black and white photography, making them one of the best tools to use for both styles of photography.
- Color photography: luminosity masks can be used to control both the luminosity as well as the color in the image. They can be used to isolate different areas of color, or objects of different color and modify their brightness, hue, or saturation, and even to modify the color itself by changing it slightly or completely.
- Black and white photography: luminosity masks are an immensely powerful tool to use in black and white photography. Since the masks are based on the levels of luminosity of an image, by using these masks we can isolate the levels of light in a black and white photograph which gives us the utmost control over the levels of highlights, midtones or shadows. Controlling the levels of light is the most important aspect of black and white photography post-processing. Especially when the subjects of the image are not regular and where we cannot use line selections, luminosity masks will give us the power to work with different areas and subjects independently of one another and be able to control the disposition of light, so we can express our vision in the most faithful way. Read here a complete guide to black and white photography to get a good understanding of how to work with light and shadow as a tool to use when using luminosity masks.
Using Luminosity Masks for Various Purposes
Luminosity masks can be used for a variety of purposes, for instance:
- Creating selections based on luminosity: What luminosity masks do best is create selections based on luminosity which can be used for selective editing and to apply different effects to different areas of the image.
- Selecting objects: Luminosity masks can select objects very easily when there is a difference in brightness among different objects in the image.
- Working non-destructively: by working with masks, not only Luminosity Masks but any kind of masks, and with selections, we can apply different effects to the image without needing to work directly on the main layers but by applying those effects through adjustment layers, through color layers or dodge and burn layers. This is a phenomenal advantage when working on a more complex image and, in many cases, the only way we can achieve a high-quality image that looks exactly like our vision.
- Tone and contrast adjustments: Luminosity masks allow you to target specific brightness ranges in an image, which makes it easier to adjust the overall tone and contrast.
- Removing shadows and recovering highlights: Luminosity masks can be used to remove or brighten shadows in underexposed areas of the image, and to bring back the detail or recovering highlights in the sky in an overexposed area.
- Working with dodge and burn: luminosity masks are an excellent tool to apply the technique of dodging and burning on an image in both color and black-and-white photography.
- Applying different adjustment layers and filters selectively: luminosity masks can be used to apply adjustment layers or Photoshop filters to an image in a selective way, by controlling through the level of luminosity where that specific adjustment will be applied and at what intensity.
- Selective color adjustments: By targeting specific brightness ranges, you can selectively adjust the color in different areas of an image.
- Manual exposure blending, increasing dynamic range and creating High Dynamic Range (HDR) images: Luminosity masks can be used to blend multiple exposures of the same scene to create an image with a greater dynamic range of brightness and color.
- Creating composite photography projects: Luminosity masks can be used to combine different images or to add subjects or areas from a completely different image to the base image, creating a new story or a different world. For instance, replace the sky, combine images taken at different moments or with different subjects etc.
PHOTOGRAPHY GENRES SUITED FOR LUMINOSITY MASKS
Practically, any photography genre is a candidate for using luminosity masks. Let’s look now in this complete guide to luminosity masks at a few genres and how to use luminosity masks when working with these genres.
- Architecture and real estate photography: You can use luminosity masks in combination with line selections to isolate different areas or surfaces of a building or structure which are lit differently. This allows us to adjust or even completely change the light and color balance on those surfaces or areas and emphasize the effect of depth and three-dimensionality. Creating depth and three-dimensionality In an architectural photograph is fundamental, which is why this technique is so valuable for architectural photography.
- Still-life photography: just as in the case of architecture photography, you can use luminosity masks in still-life photography to control the level of light or color on different surfaces of the photograph objects in order to create more definition, to separate the objects from one another, to create more depth and three-dimensionality, and to create a certain atmosphere.
- Landscape and nature photography: You can use luminosity masks in landscape and nature photography to bring out the details and colors in images. Just like in architectural photography, in landscape photography, luminosity masks are valuable in order to modify the levels of brightness or darkness in different areas of the image, highlighting the subjects and the composition and subduing areas that are less important for the general meaning of the image.
- Night photography: In night photography, you can use luminosity masks to bring back shadows or to control the intensity of the bright areas, also to control the intensity and spread of the specular lights. When I shoot more challenging night photographs, I sometimes shoot more than one images, exposed for different areas of the scene and then use luminosity masks to retain from each image the best-exposed areas.
- Street photography: street photography is about telling the story, and one of the ways to tell the story in the most effective way is to isolate that story in the general context so the viewer can notice the elements that are important for eloquently telling that story. This means that some areas of the image are more important than others, and emphasizing those while concealing the areas that are not important is of utmost importance. This process of emphasizing/concealing elements is accomplished by working with both composition and light. While the composition has to be done in the camera, luminosity masks are a very versatile tool when working on controlling the light in post-processing.
- Portrait, wedding, sport or pet photography: Luminosity masks can be used to make adjustments to specific parts of a portrait, such as brightening the eyes, whitening the teeth, and smoothing the skin for any human subjects, as well as emphasizing the characteristics of animal subjects when applied in animal or pet photography, like highlighting the eyes, the fur etc. For any genre of photography that works with individual subjects or groups, luminosity masks can help emphasize the qualities of the subject in combination with the environment where they are photographed. They can also be used to control the luminosity or colors of the background to create more definition between the subject and its background.

HOW TO USE LUMINOSITY MASKS?
Once you have created the luminosity masks, you can use them to adjust the brightness and contrast of specific areas of the image. Simply activate the mask as a selection and apply the desired adjustments, such as Curves or Brightness/Contrast, to the image. This process gives you precise control over the luminosity values in the image and allows you to create custom selections based on the RGB channel information. You can repeat this process as needed to refine the luminosity masks and achieve the desired result.
There are many different ways to use Luminosity Masks. Let’s now look at one of the most popular and most useful uses of luminosity masks and let’s analyze it.
I am talking now about exposure blending, one of the fundamental uses of luminosity masks. It couldn’t be missing from this complete guide to luminosity masks.
EXPOSURE BLENDING
HOW TO USE LUMINOSITY MASKS TO MANUALLY BLEND IMAGES BASED ON THEIR EXPOSURE
One of the most widespread and useful techniques where luminosity masks will help you tremendously is exposure blending
The goal when blending images based on their exposure is to create a resulting image that has more detail in the shadows and the highlights than a single capture of that scene would have.
Our cameras, even the most advanced cameras, sometimes cannot capture the entire tonal range of a scene, especially when shooting in very contrasty conditions. When that happens, the only way to retrieve the detail in the shadows and the highlights without losing image quality, is to blend multiple exposures, using from each exposure the highlights, shadows, and midtones, respectively.
One option to overcome this narrow dynamic range of most cameras would be to use HDR software that would blend the images for you, but that doesn’t always give the best results, and most of the time you don’t have too much control over the result. The better option is to blend those images manually by using luminosity masks.
To understand how you can do that in the simplest way, I am presenting here a detailed example of using luminosity masks to blend three bracketed images in Photoshop. You can follow the same workflow to blend five or more bracketed images covering the entire tonal range of the scene in front of you. You can also use the same technique to blend two images.
To do that, you will need to have three exposures. If you need more exposures to cover the entire tonal range of the scene, you can shoot five or even seven exposures following the same principles. The three exposures are:
- A base exposure, or normally exposed images, exposed for the midtones of the scene you photograph.
- An overexposed image, exposed for the shadows, where you will have enough details in the shadows.
- An underexposed image, exposed for the highlights, where you will have enough detail in the highlights.
EXPOSURE BLENDING WITH LUMINOSITY MASKS – STEP-BY-STEP
These are the steps of the exposure blending workflow with luminosity masks:
1. First, obviously, you need to shoot three images exposed for the midtones, highlights and shadows.
2. Download and install the 16-bit (en)Visionography Luminosity Mask Action to Photoshop. To download the action, sign up to the list above and you will receive everything via email.
3. Open the three bracketed images in Photoshop. Make sure they are all properly aligned by selecting all layers and going to Edit > Auto-Align Layers > Auto.
4. Select the three layers and right-click to select “Convert to Smart Object”. This will allow you to apply adjustments non-destructively and make changes later on if needed. This step is not always necessary, but only if you need to edit your bracketed exposures before blending.
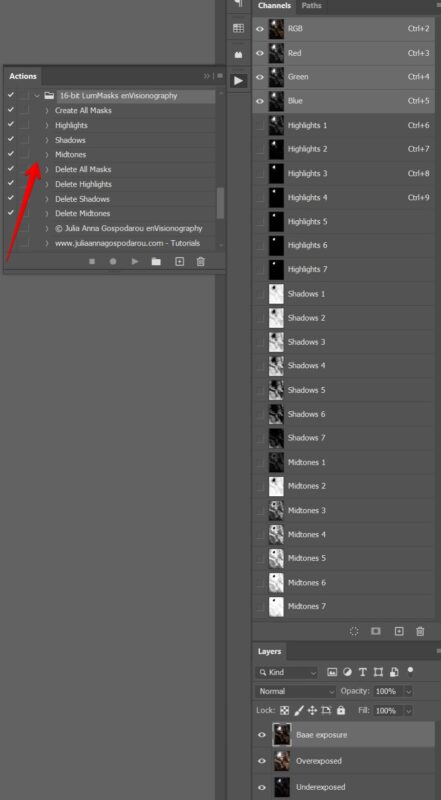
5. Place your base exposure on the top layer so you can create your luminosity masks based on this exposure.
6. Run the (en)Visionography LumMasks action by clicking on the option “Create All Masks”. This will create all the 21 16-bit luminosity masks based on your base exposure, meaning 7 Highlights masks, 7 Shadows masks, and 7 Midtones masks.

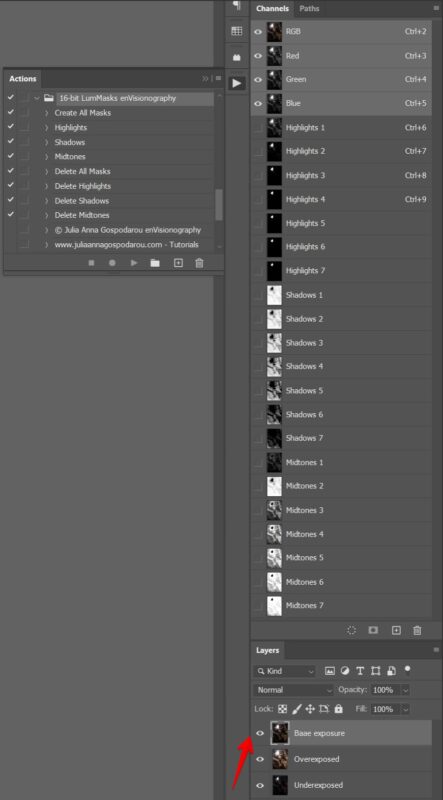
7. Check the luminosity masks you have created. You will find all luminosity masks in the Channels panel in Photoshop. If the Channels panel is not active, you can activate it by going to Window > Channels.
8. Search for the luminosity mask that covers best the highlights, then for the mask that covers best the shadows, then search for the mask that covers best the midtones. You will choose these masks every time depending on the level of light in your image and you will select the ones that fit best each case. So, in some images, for instance, you will choose for the highlights the Highlights 1 luminosity mask , in others the Highlights 2, or 3 and so on, depending on which mask covers best the highlights area you need to retain. Similarly, you wil choose the mask covering the midtones or shadows. These masks can be different each time. So do not search for a formula on what mask to choose, just look at your image and observe which mask works best, if needed by trial and error.
9. The intention when searching for the most suitable luminosity masks is to find the ones that will best retrieve the highlights in the underexposed image, the shadows in the overexposed image and the midtones in the base image. Since what you’re looking for is to isolate these areas, you will choose the luminosity mask that has the highest contrast between that area and the rest of the image.
10. Move your base image layer below the overexposed and underexposed image layers. Your base image will be at the bottom.
11. Select the overexposed image layer and add a black layer mask to the layer. To add a black layer mask, hold Alt/Option and left-click the Add a Mask icon on the Layer panel.
12. Select the underexposed image layer and add a black layer mask to the layer, by repeating the step above.
13. Go to the overexposed layer (you can also start with the underexposed layer if you want) and click on the mask. This will select the mask so you can paint on it. Be careful not to select the layer. We need the mask to be active.
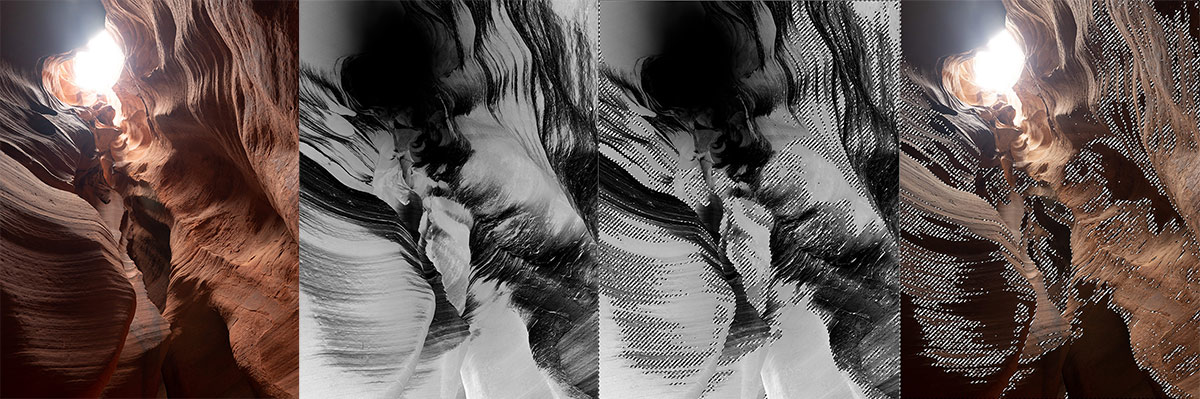
14. Select the suitable luminosity mask that you will be using. For the underexposed layer you will need to select the Highlights masks since you have exposed this image to get the most detail in the highlight areas.
15. Transform the luminosity mask into a selection by holding Ctrl/Command and clicking on the mask icon in the channels panel. This will select the bright areas of the mask.

16. With the selection active, go to the mask you have added previously to the underexposed layer, select it, and then select the Paintbrush.
17. With the Paintbrush selected, set the opacity of the brush to 100% if you want to retrieve the entirety of the highlights from that layer, or to a lower opacity, say 50% or 70%, to have more control over the painting. Then start painting with a large soft brush over all the areas where the mask is bright. This will make these areas visible on the underexposed layer, and at the same time will hide these areas from the base image underneath.
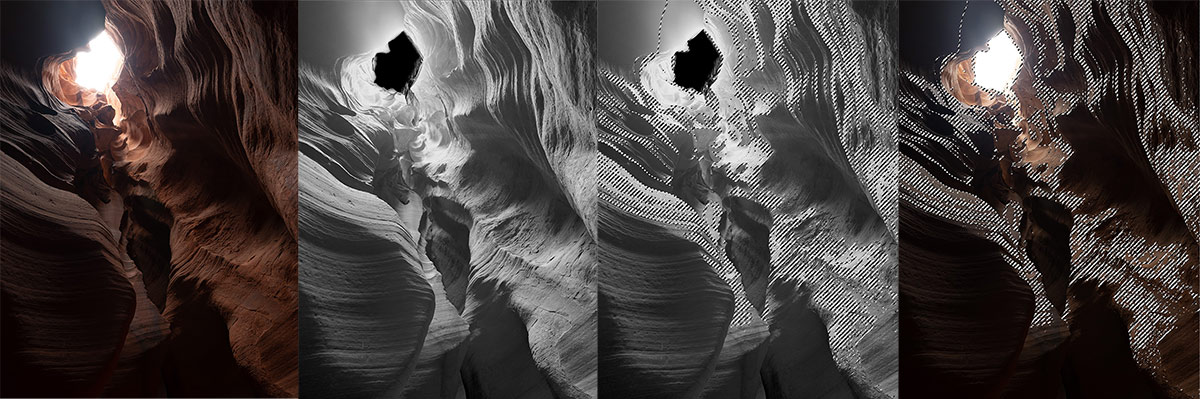
18. Then move to the overexposed layer. By following the same steps, select one of the Shadows masks which will help you retrieve the details in the shadows. Then make this mask a selection, go back to the black layer mask you have applied on the overexposed layer, click on it to select it, and repeat the previous steps to retrieve the details from the shadow area.
19. Now you will have selected the highlights in the underexposed layer, and the shadows in the overexposed layer, and you will have the midtones in the base layer.
20. By overlapping these three exposures and using luminosity masks, you will have selected the well-exposed areas from each exposure and made them visible in the blended image.
21. If needed, you can control even more the midtones in the Base Exposure by selecting the suitable Midtones luminosity mask and painting on it.
22. Once you are happy with the final blended result, go to Layer > click on Alt/Option + Merge Layers, or use the shortcut Ctrl/Command + Alt/Option + Shift + E to merge all layers into a single layer on the top of everything.
23. From here on, you can continue editing the image to get the desired result, and you can further use luminosity masks to do that in combination with other tools.
24. Once you accomplish your vision, save your final image and enjoy! You have created a work of art!
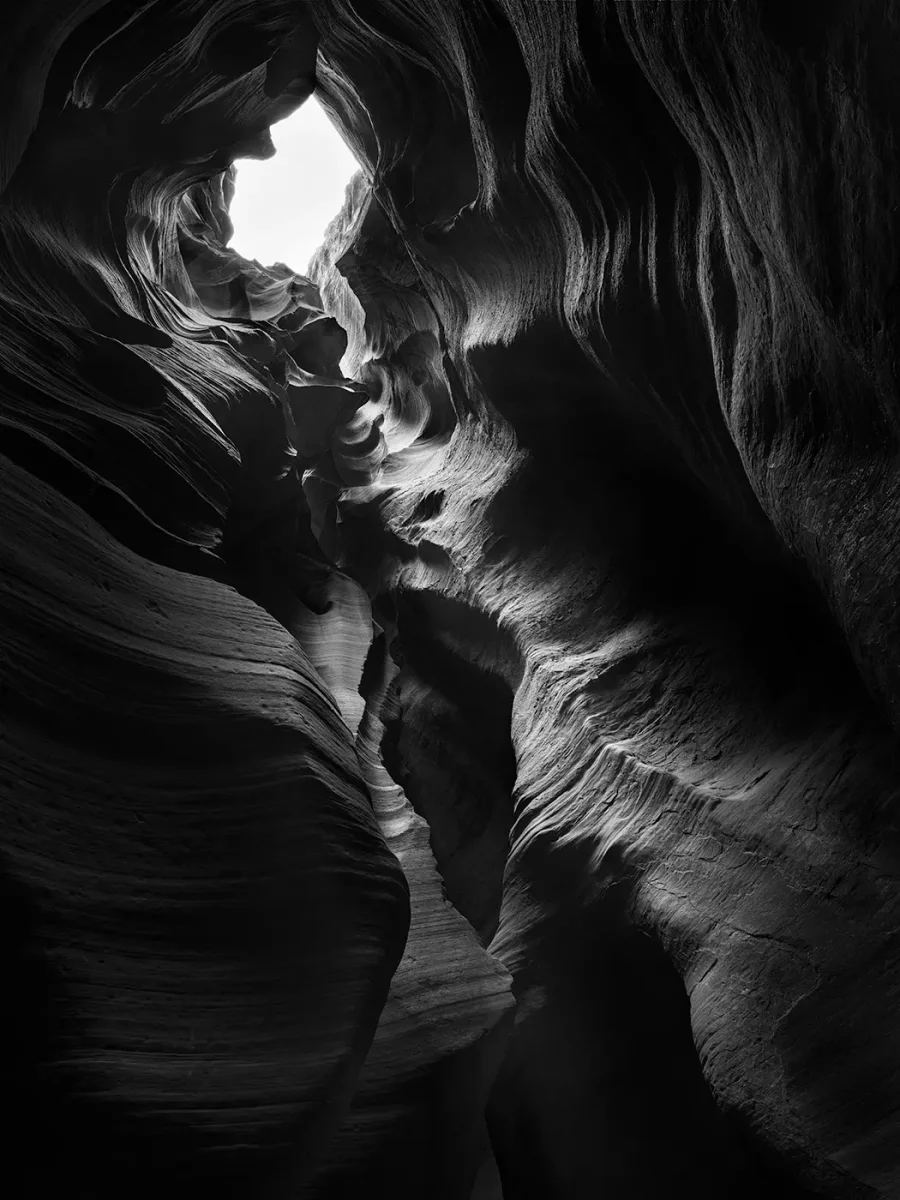
Here you can see the result of the exposure blended image we just created.

From here on, the remaining processing workflow will focus on working with light to bring the image from the stage of a well-exposed image (accomplished through exposure blending) to the level of artistic expression of your vision. That is where the real magic happens.

LIGHT AND SHADOW PAINTING WITH LUMINOSITY MASKS
THE METHOD OF PHOTOGRAPHY DRAWING™
Luminosity masks are a powerful tool not only to do exposure blending to correct the levels of light, but also to creatively control the light and shadow in an image. We can selectively modify the bright and dark tones in the image, to transform it according to your vision.
By using luminosity masks, we can paint with light and shadow according to the laws of light, in order to enhance the balance of light in the image or to even completely modify it. In other words, we can apply what I call the method of Photography Drawing.
Used with Luminosity Masks, the Photography Drawing technique has no limits. By using these tools right, you can create everything your mind can imagine.
I have talked about my method Photography Drawing repeatedly in the past, and you can find more details about this method in my Free Tutorials section, also you can watch my video course From Vision To Final Image – Mastering B&W Photography Processing for a full demonstration of this method I use to process my images.
The technique of Photography Drawing was born in my knowledge of classic drawing that I have used for years as an architect in my designs. The principles I use are the fundamental principles of working with light and shadow used for centuries in classic drawing, architectural drawing, and painting, principles that I have simplified and adapted to photography so they can be easily used by everyone. I demonstrate these principles in my workshops and mentorships, and I present them in my education materials as well.
Except for this complete guide to luminosity masks, I plan to make another tutorial soon about how to use luminosity masks to create Photography Drawing, so you can subscribe to my website to be informed when that tutorial is out.
To get an idea of the final result, below you can see the final image in the black and white version, as well as the one in the color version. This shows the power of luminosity masks to create both color and black and white photography.

LUMINOSITY MASKS ACTION VS LUMINOSITY MASKS PANELS
There are quite a few luminosity masks panels available online, some of them free and some other paid, that you may want to try.
Should you work with a panel, or is a luminosity masks action enough?
You will hear many opinions related to this, ranging from photographers who swear by a certain tool all the way to those who only use Photoshop for all their post-processing. Probably the truth is somewhere in the middle. It also depends a lot on how much you want to learn the actual tools that give you real control over your images, or if you are looking for shortcuts or “magic solutions”. If you ask me, there are no magic solutions in photography editing. Just like there are no magic solutions in art. You either learn to do it or you don’t. And anything that stands between you and the knowledge will only be a crutch.
So, while some of the panels you will find are valuable and their creators have put a lot of work into them, which is admirable, personally, I think that a Luminosity Masks action is pretty much all you need to control and create the effects I talked about in this tutorial and this is what I use.
My first recommendation would therefore be to learn to work with these techniques in Photoshop instead of using too many automated tools, like panels and plug-ins. All Photoshop panels are obviously based on Photoshop. They replicate Photoshop commands, but the original commands in Photoshop are the ones that will give you the most control, quality, and accuracy if you learn to use them. To speed up some portions of working on an image, some of these automatic tools may be tempting or useful. However, from my experience, the quickest way of doing anything in Photoshop is by using Photoshop itself.
This is why, in my post-processing, to work selectively with light, I mainly use the luminosity masks I presented to you, which you can download for free, the 16-bit (en)Visionography LumMask, after having used for quite some time the original luminosity masks made by Tony Kuyper.
The masks I created are 7-level deep and more extended than the masks I was working with previously, giving me all the control I need over the light levels in the image. I created this action to be the most refined among the tools out there so I don’t need to refine these masks even more when working with them and to speed up the processing workflow.
However, the masks are further adjustable, so you can tweak them to your heart’s desire and play with them as much as you want and adapt them to each image you work on. I could say that these masks are “infinitely adjustable” if you need that level of adjustment. Combining these luminosity masks with line selections and with working with layers, adjustment layers, and non-destructive dodge and burn painting, what I call Photography Drawing, I can control anything in an image. This allows me to create any image based on my vision, and you can see a selection of these images in my photo gallery.
CONCLUSION
I hope you enjoyed this complete guide to luminosity masks and that it will make a change in your photography, giving you inspiration and the tools to put your vision into your work in the most accurate way.
If you want to learn more about this subject and see how to apply this workflow in your own images, join us in one of the upcoming (en)Visionography workshops, where I demonstrate extensively how to work with luminosity masks and many other tools in any genre of photography. You will combine this with building a great portfolio in the most amazing locations in the world, where you can create iconic fine art images together with like-minded people. What more can we wish for?
If you have more ideas about how to use luminosity masks, feel free to share them in the comments for everybody to get more inspiration.
And if you’re curious about my further thoughts on this subject and many other photography-related subjects, subscribe to my website and join our community, where we talk extensively about everything photography, from vision to advanced postprocessing, so you don’t miss a thing.
If you are interested to know more about black and white fine art photography, inspiration, (en)Visionography, long exposure photography, architecture fine art photography, and many other subjects, feel free to read my other tutorials and have a look at my books and courses.
FURTHER STUDY RESOURCES
FINE ART BLACK AND WHITE PHOTOGRAPHY, ARCHITECTURAL PHOTOGRAPHY, LONG EXPOSURE PHOTOGRAPHY
Find more resources about fine art black and white photography, (en)Visionography, long exposure photography and architecture photography in Julia Anna Gospodarou’s extensive collection of photography tutorials. To receive free future tutorials, you can subscribe here.
Learn more about how to create fine art photography, architectural photography, long exposure, etc. from conception to advanced processing in Julia’s video courses Understanding Fine Art Architectural Photography – The Complete Course, From Vision to Final Image – Mastering Black and White Photography Processing, in the video tutorial Long Exposure, Architecture, Fine Art Photography – Creating (en)Visionography, and the book From Basics to Fine Art – Black and White Photography, or by attending one of her highly appreciated workshops.
Find Julia’s recommendation for the best software and gear to create fine art photography and curated deals and discounts for these tools.
To study with Julia Anna Gospodarou personally, find out about our
Support our mission for high quality photography education. Donate now!
We believe in knowledge, education, and the freedom of spirit that creates great art. We believe in art and artists.
Please donate to help us continue sharing free high quality photography education and inspiration.
For more than one and a half decades, we have been sharing free content on fine art photography, black and white photography, architecture photography, long exposure photography, as well as our original concepts of “(en)Visionography” and “Photography Drawing”.
Thousands of photographers started their journey in fine art photography here and found inspiration and practical resources that empowered them. Many have won awards for their work and are making a career in photography based on knowledge acquired from our free tutorials, books, courses, and workshops.
This makes us incredibly proud of our work.
To empower even more photographers to reach their dreams, we want to keep this resource free forever so every new or advanced photographer can have access to knowledge, quality photography education, and inspiration.
To help us in our efforts, please consider becoming a patron of this cause with your recurring donations.
You will be part of a generous effort by other exquisite art and photography-loving patrons, and you can be proud of being a supporter of art and artists like the famous Maecenas of the past. Art and artists need your support, as always in the history of art and photography.
Thank you!
Julia Anna Gospodarou – Founder – (en)Visionographer
Founder of (en)Visionography™ and creator of Photography Drawing™, internationally acclaimed fine art photographer, Master architect, educator, and best-selling author, with 25+ years experience in photography and architecture, Julia Anna Gospodarou is a leader in modern fine art photography who shaped with her work the way architecture fine art photography looks today.
Awarded more than 100 times in the most important photography competitions worldwide, two-time International Photography Awards IPA Photographer of the Year, World Photography Awards SWPA, and Hasselblad Masters Finalist, her work was widely exhibited and published internationally.
With a passion for the world’s civilizations and speaking six languages, Julia was always in the avant-garde of thinking as an architect and a photographer, constantly pushing the limits of what is possible, constantly reinventing herself as an artist and an individual. Her huge love for travel and discoveries and her passion for teaching, art, and photography led her to become in the past one and a half decades one of the world’s top-rated fine art photography educators and workshop organizers.